


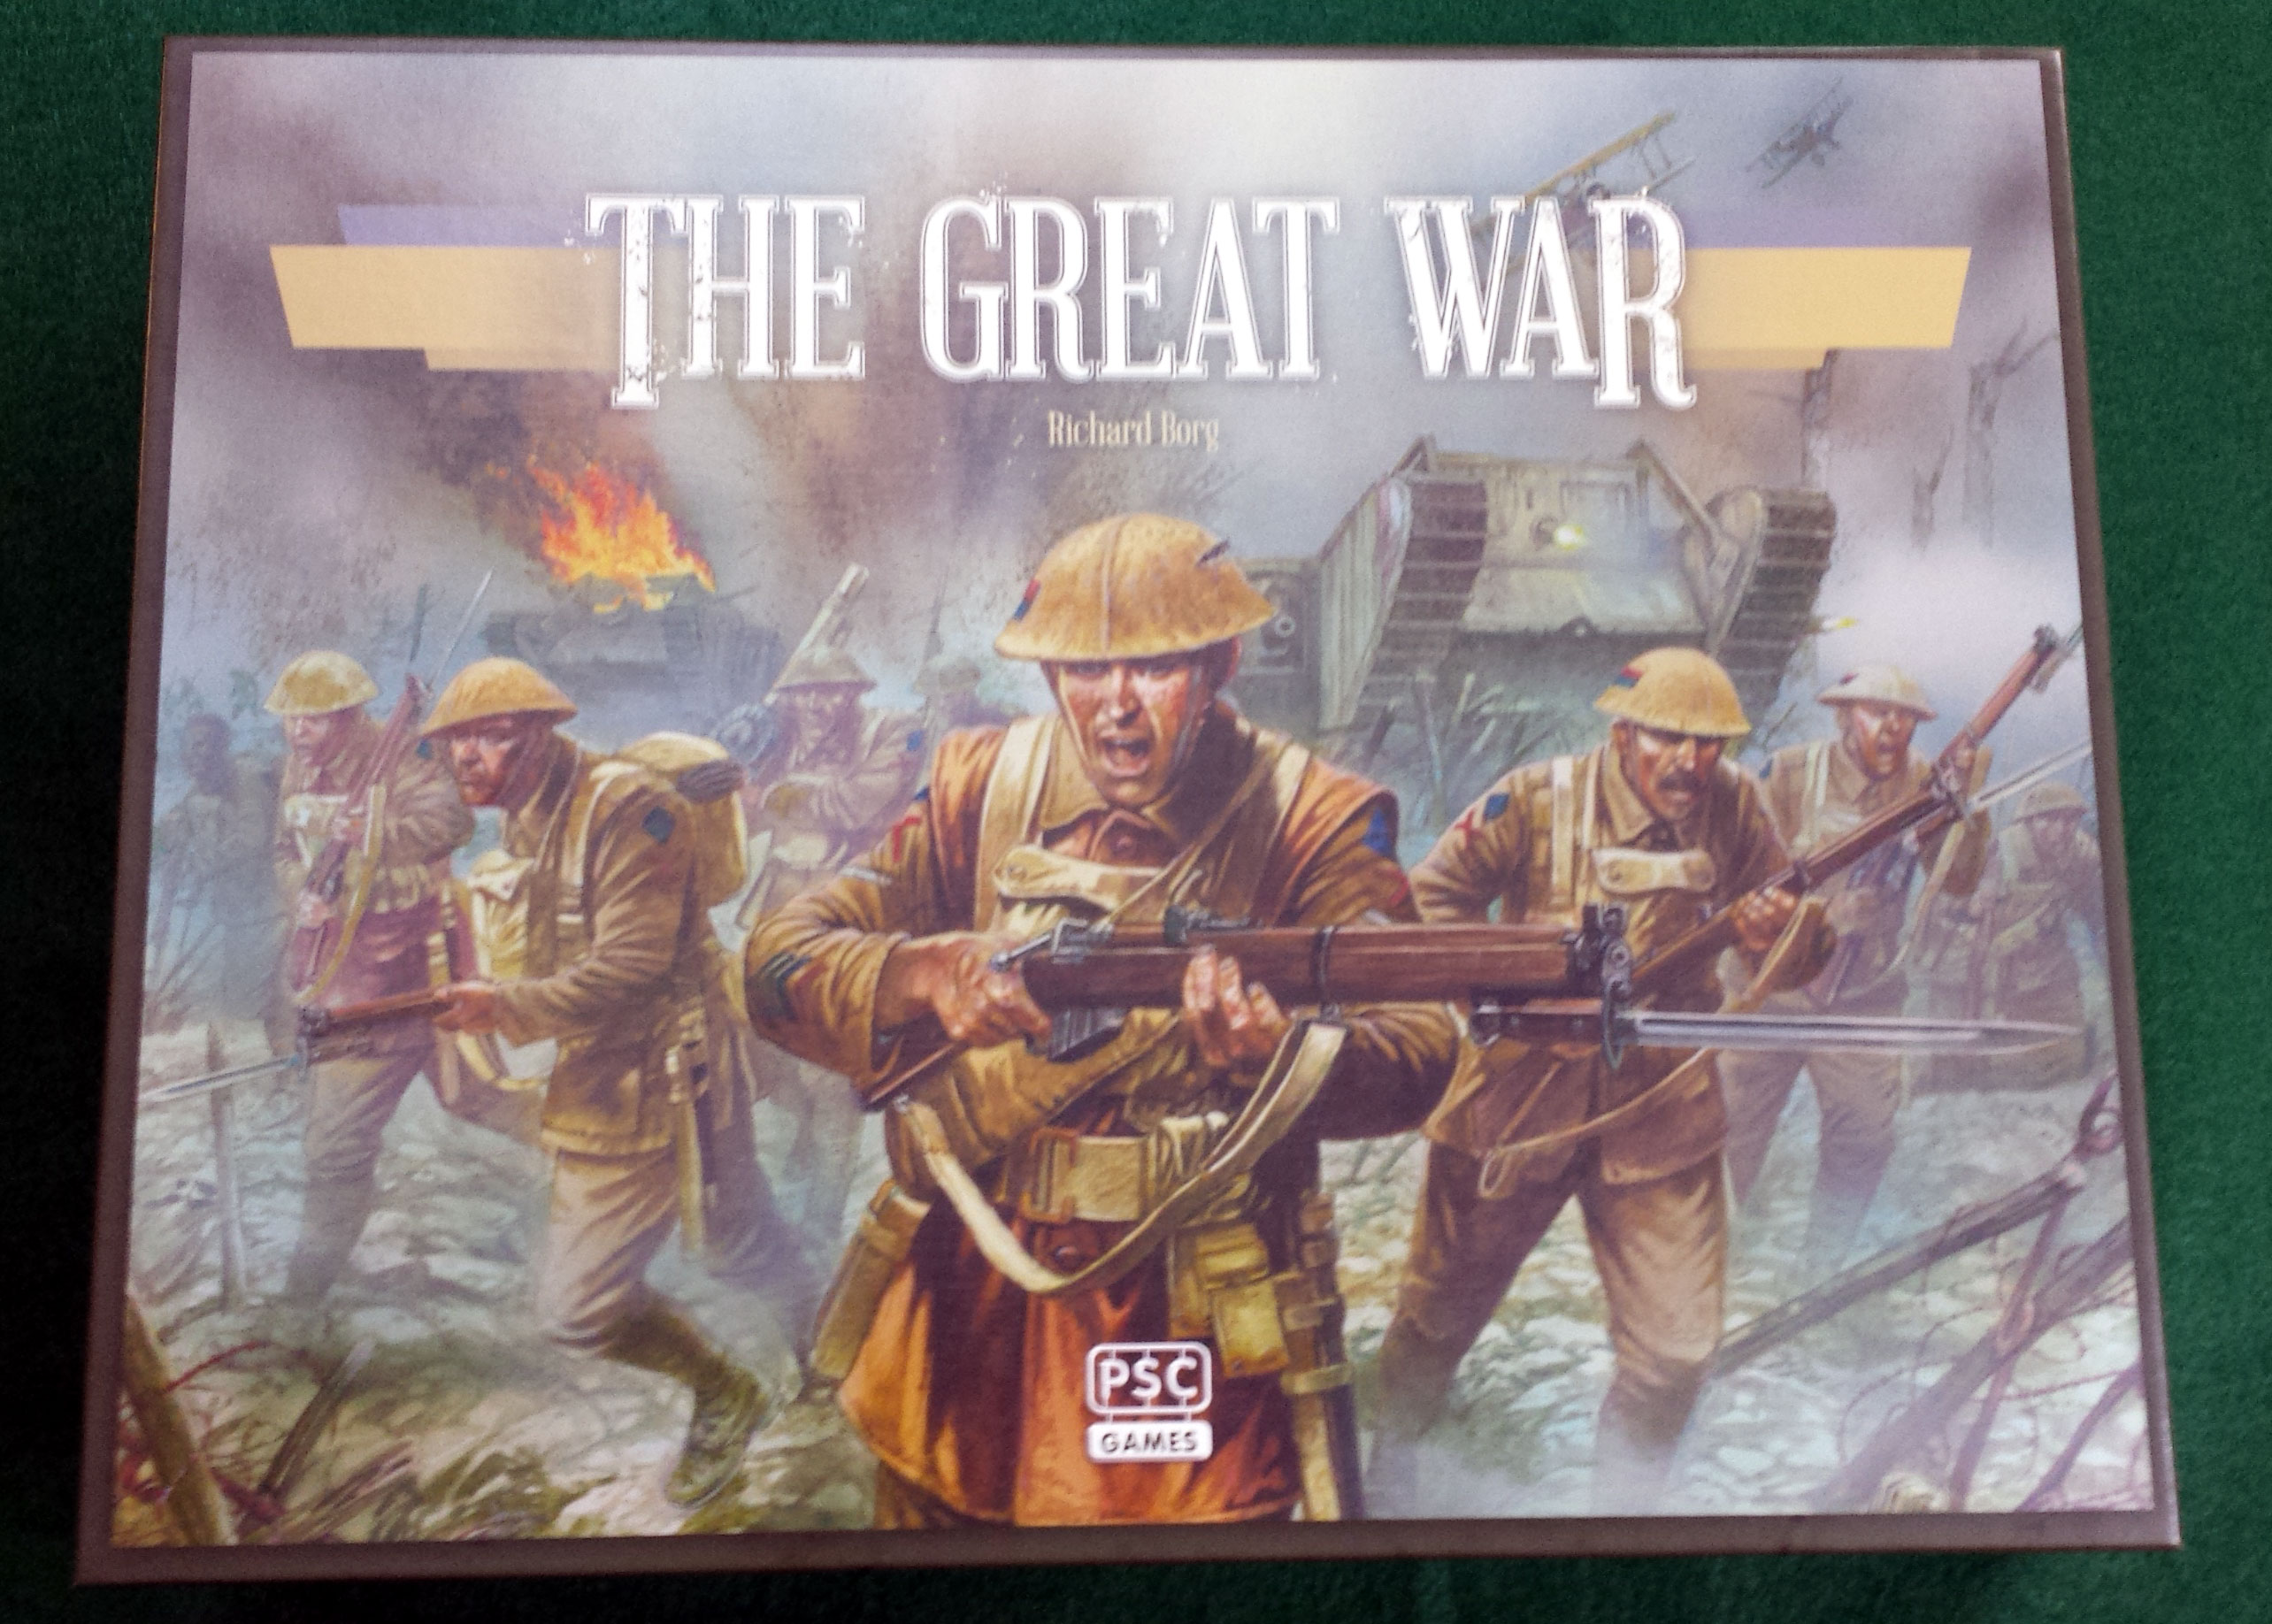
So yeah, it’s been a while since I posted Part One. During World War I, trench warfare bogged down progress tremendously and many conflicts subsequently drug out for months on end. Think of the delay as me trying to illustrate that point? Fortunately, The Great War does a much better job of representing the style of warfare that wend on during World War I. This post will continue my exploration of that game, as well as provide my opinion on what makes it work.
In The Great War (Part One) Unboxing the Game, I went over the components. For this piece, I will focus on the mechanics and game play. For those not familiar with Command and Colors, here is an overview of the system, as described on the BoardGameGeek web page for Command and Colors:
“The Command and Colors system is a simplified wargaming system designed by Richard Borg. Common elements of all Command and Colors games are a deck of Command Cards, which can be classified as Section cards and Tactics cards, and Battle Dice. In the Command and Colors System the playing field is divided into a center section and a right and left flank. Section cards are used to allow the ordering of unit(s) occupying one or more sections. Tactics cards are also available to allow special attacks. Another identifying feature of the system is the use of battle dice to resolve individual battles.”
The list of games using the system starts with Battle Cry, which is Civil War era, and goes on to include: Command & Colors: Ancients, Command & Colors: Napoleonics, BattleLore 2nd Edition (the first edition uses a much modified version of the system), Samurai Battles, and most notably, Memoir ’44. Each game uses the same base system described above, but is then modified to better represent the era. One of the things I like so much about this system is once you learn the base rules, a whole library of games becomes available to you. It makes it very easy to jump into each new game that uses Command & Colors (C&C). While it may seem that this approach lends itself to the “once you’ve played one, you’ve played them all” mentality, I think the series does a commendable job of keeping it fresh. In short, it’s very similar to Matt Leacock’s approach to his games (The Pandemic series, Forbidden Island, Forbidden Desert, etc.), there is an acute familiarity, but each game stands well on its own.
So what makes this game stand apart?

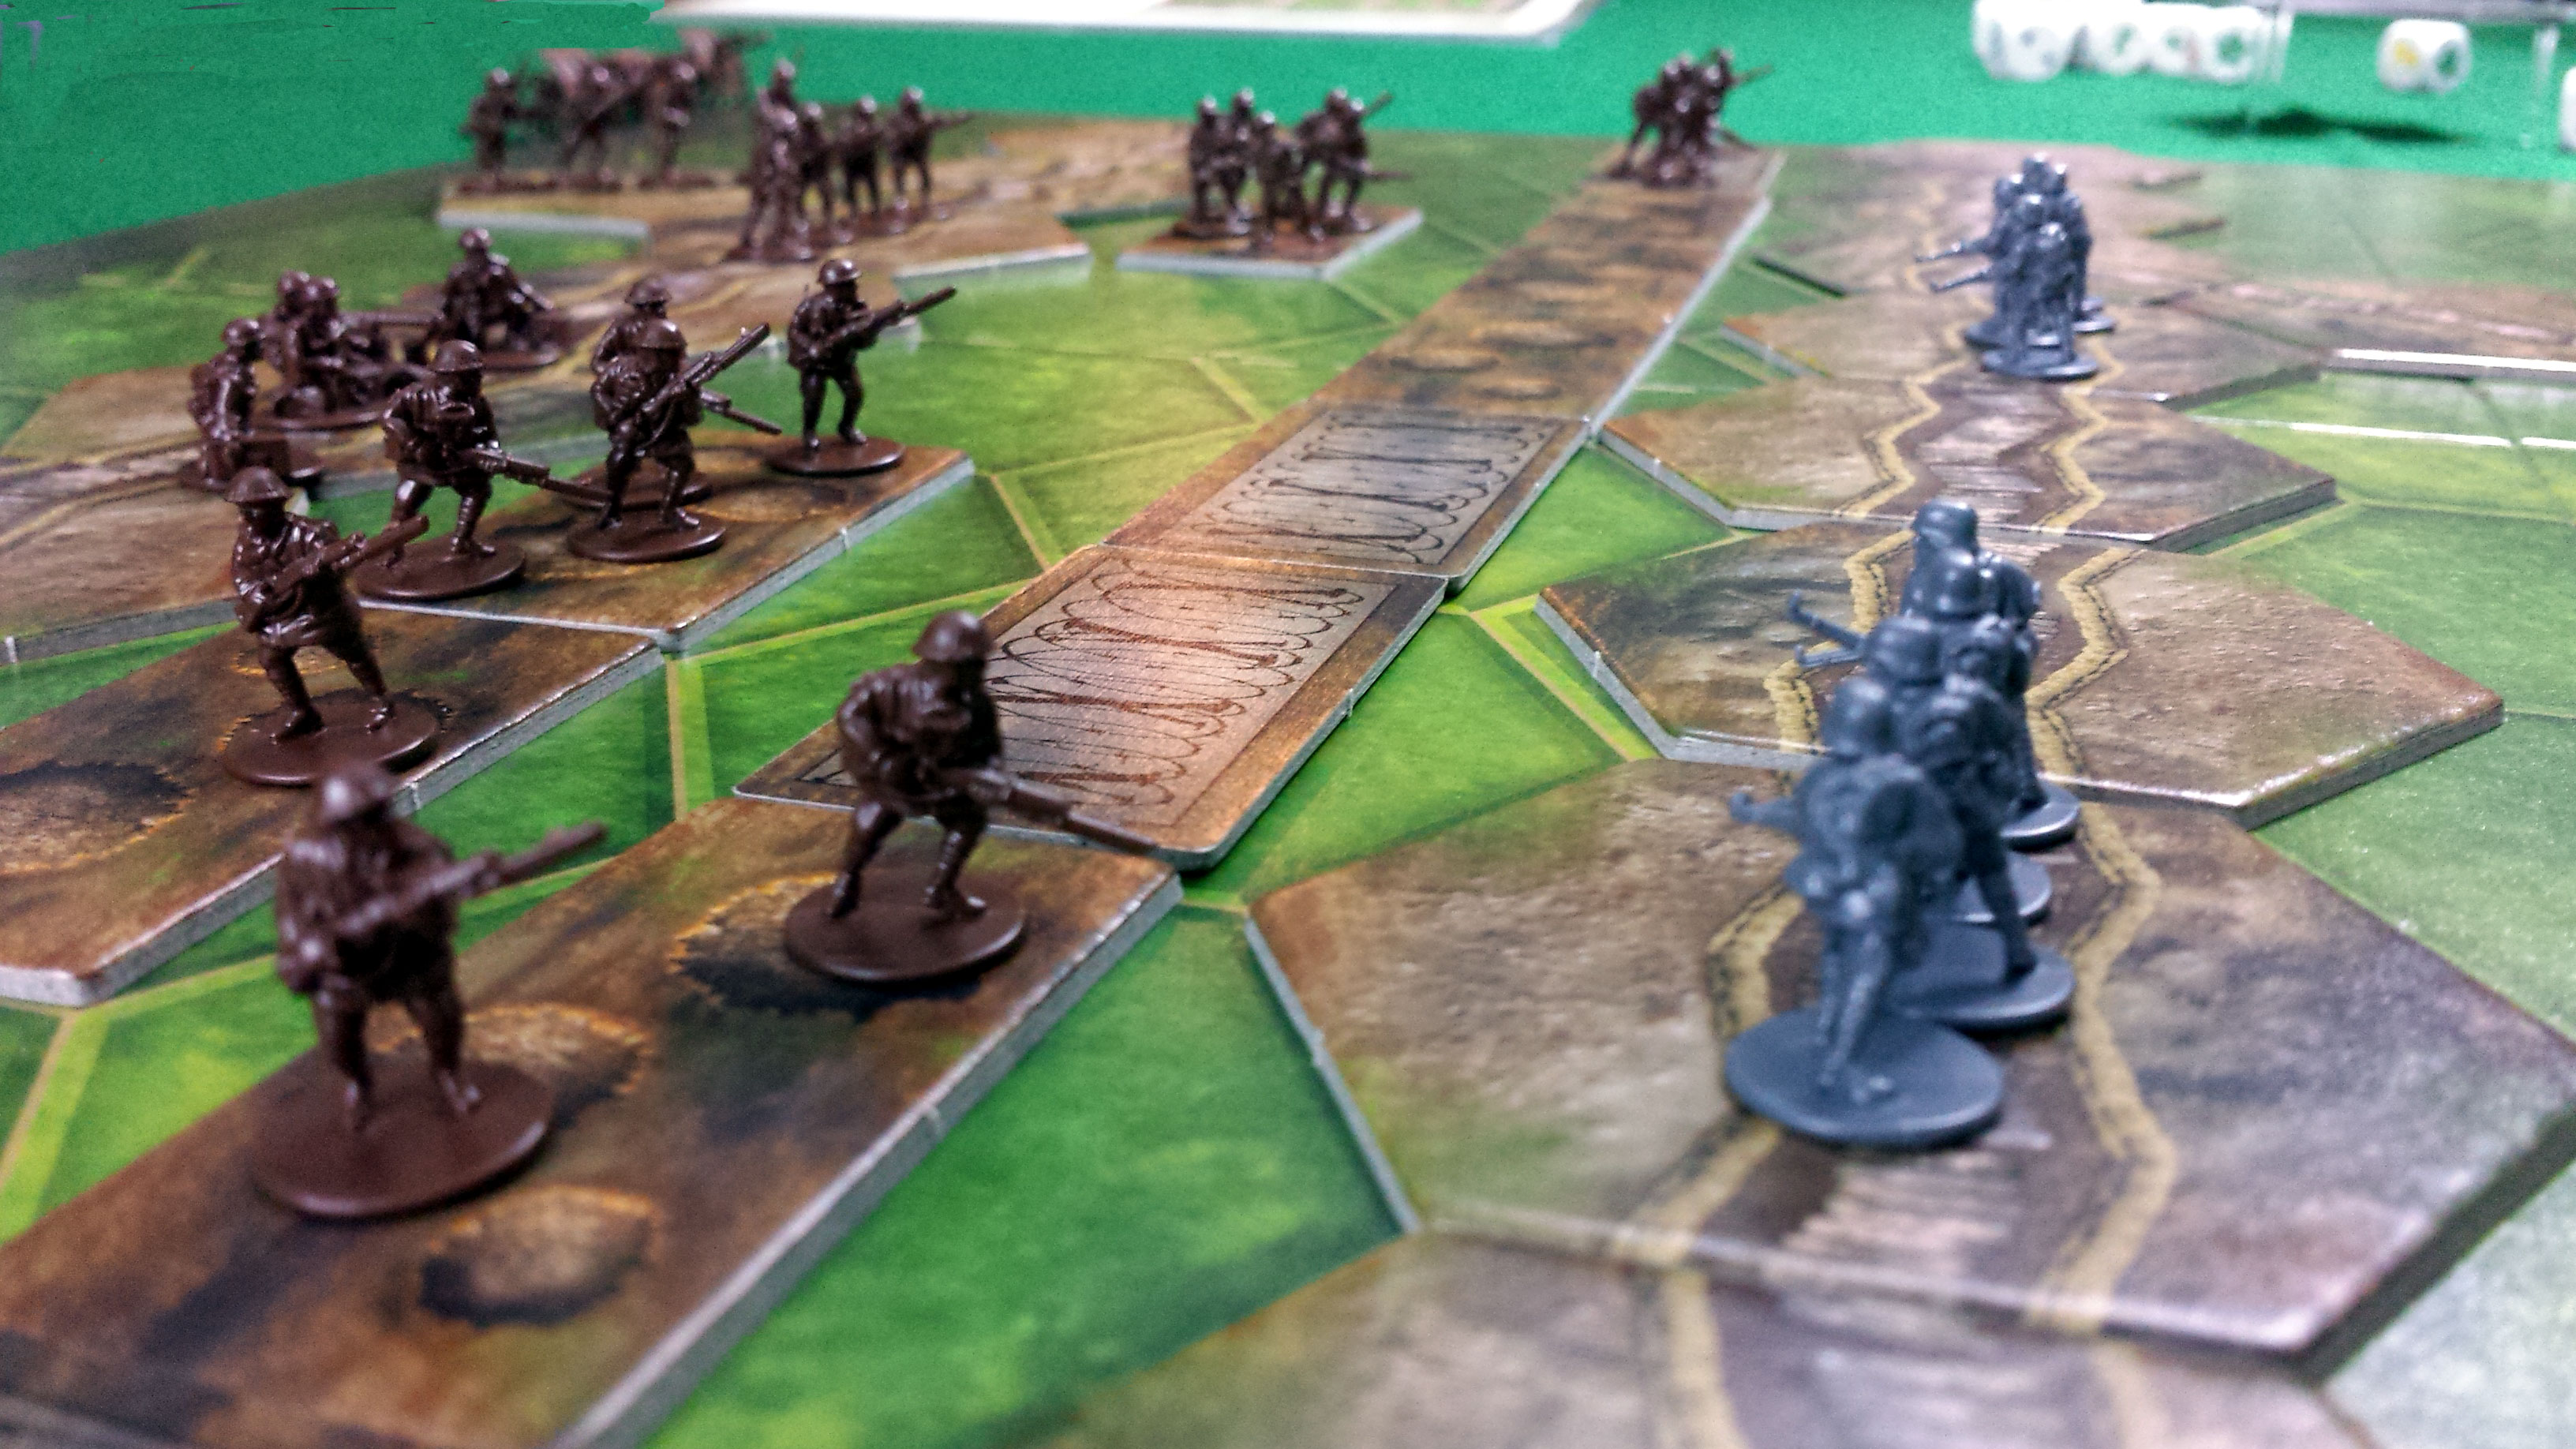
If this looks intimidating, it should. The visual aspect of this game will remind you of how devastating this war was.
Depending on the period in history, the C&C series will introduce (or re-introduce) new mechanisms to represent an aspect of that war or period. The Great War (TGW) is no different. The basic turn goes like this: Play a card from your hand, order units based on the card, movement, battle, then draw a card. Simple and effective. For TGW, there are few variations that go a long way towards making the gameplay feel unique and representative of this time period. Similar to the other games in the series, you pick a scenario and set the board with terrain tiles and figures according to the illustration and instruction. There are two introductory scenarios, which don’t have any historical significance, but designed to help teach the mechanics of the game. This is a nice idea and great for people new to the system, but those who are familiar will probably skip them and go straight for the historical setups as that historical accuracy is the basis of this game. I think PSC could’ve taken an approach similar that Memoir ’44 did with the first missions and made them historically accurate, but more straightforward to get you familiar with the basic rules. Still, you get 14 other scenario’s to play, which are broken out into three big battles, Loos (5), Somme (5), and Vimy Ridge (4). The scenarios within each battle are chronological, which was very well thought out, and there is a brief synopsis that describes what happened so you can learn how the battle progressed and what happened. As with Memoir ’44, I find each synopsis to be well written and it makes the game a good teaching (and learning) tool when playing. In short, the amount of potential game time that comes straight out of the box is enough to keep you occupied for a long while.
No-Man’s-Land Shelling: During 1914 to 1919, the technological advances for weapons of war were well ahead of conventional thinking around tactics. The result was tremendous casualties due to endless shelling and waves of troops facing machine gun fire. This resulted in both sides digging into the ground for protection, thus the beginning of trench warfare in World War 1 came about. These aspects are well represented in The Great War. Before the game begins, you perform the No-Man’s-Land Shelling Procedure. The scenario map will have arrows indicating the rows where the pre-engagement shelling will occur. Starting at the row closest the enemy, you will roll a singe die, counting the spaces from left to right. When you get to the number on the die, you place a shell crater or remove a section of barbed wire. You continue this way across the board until the count goes off the right side. Then you go to the next row and do the same thing. Even though (and thankfully) this does not impact existing terrain or troops, it can drastically change the landscape of the board, as well as your strategy, before you even make your first move. Shell craters provide combat modifications for your units. When coupled with the fact they remove barbed wire, which was one of the primary goals of the preliminary shelling operations, it can quicken your trip and lower your casualties when you decide to cross no-mans-land to make an assault. Visually, this mechanism adds gravity that helps connect you to the historical context. Google any of these battles and the images are stark and full of devastation.
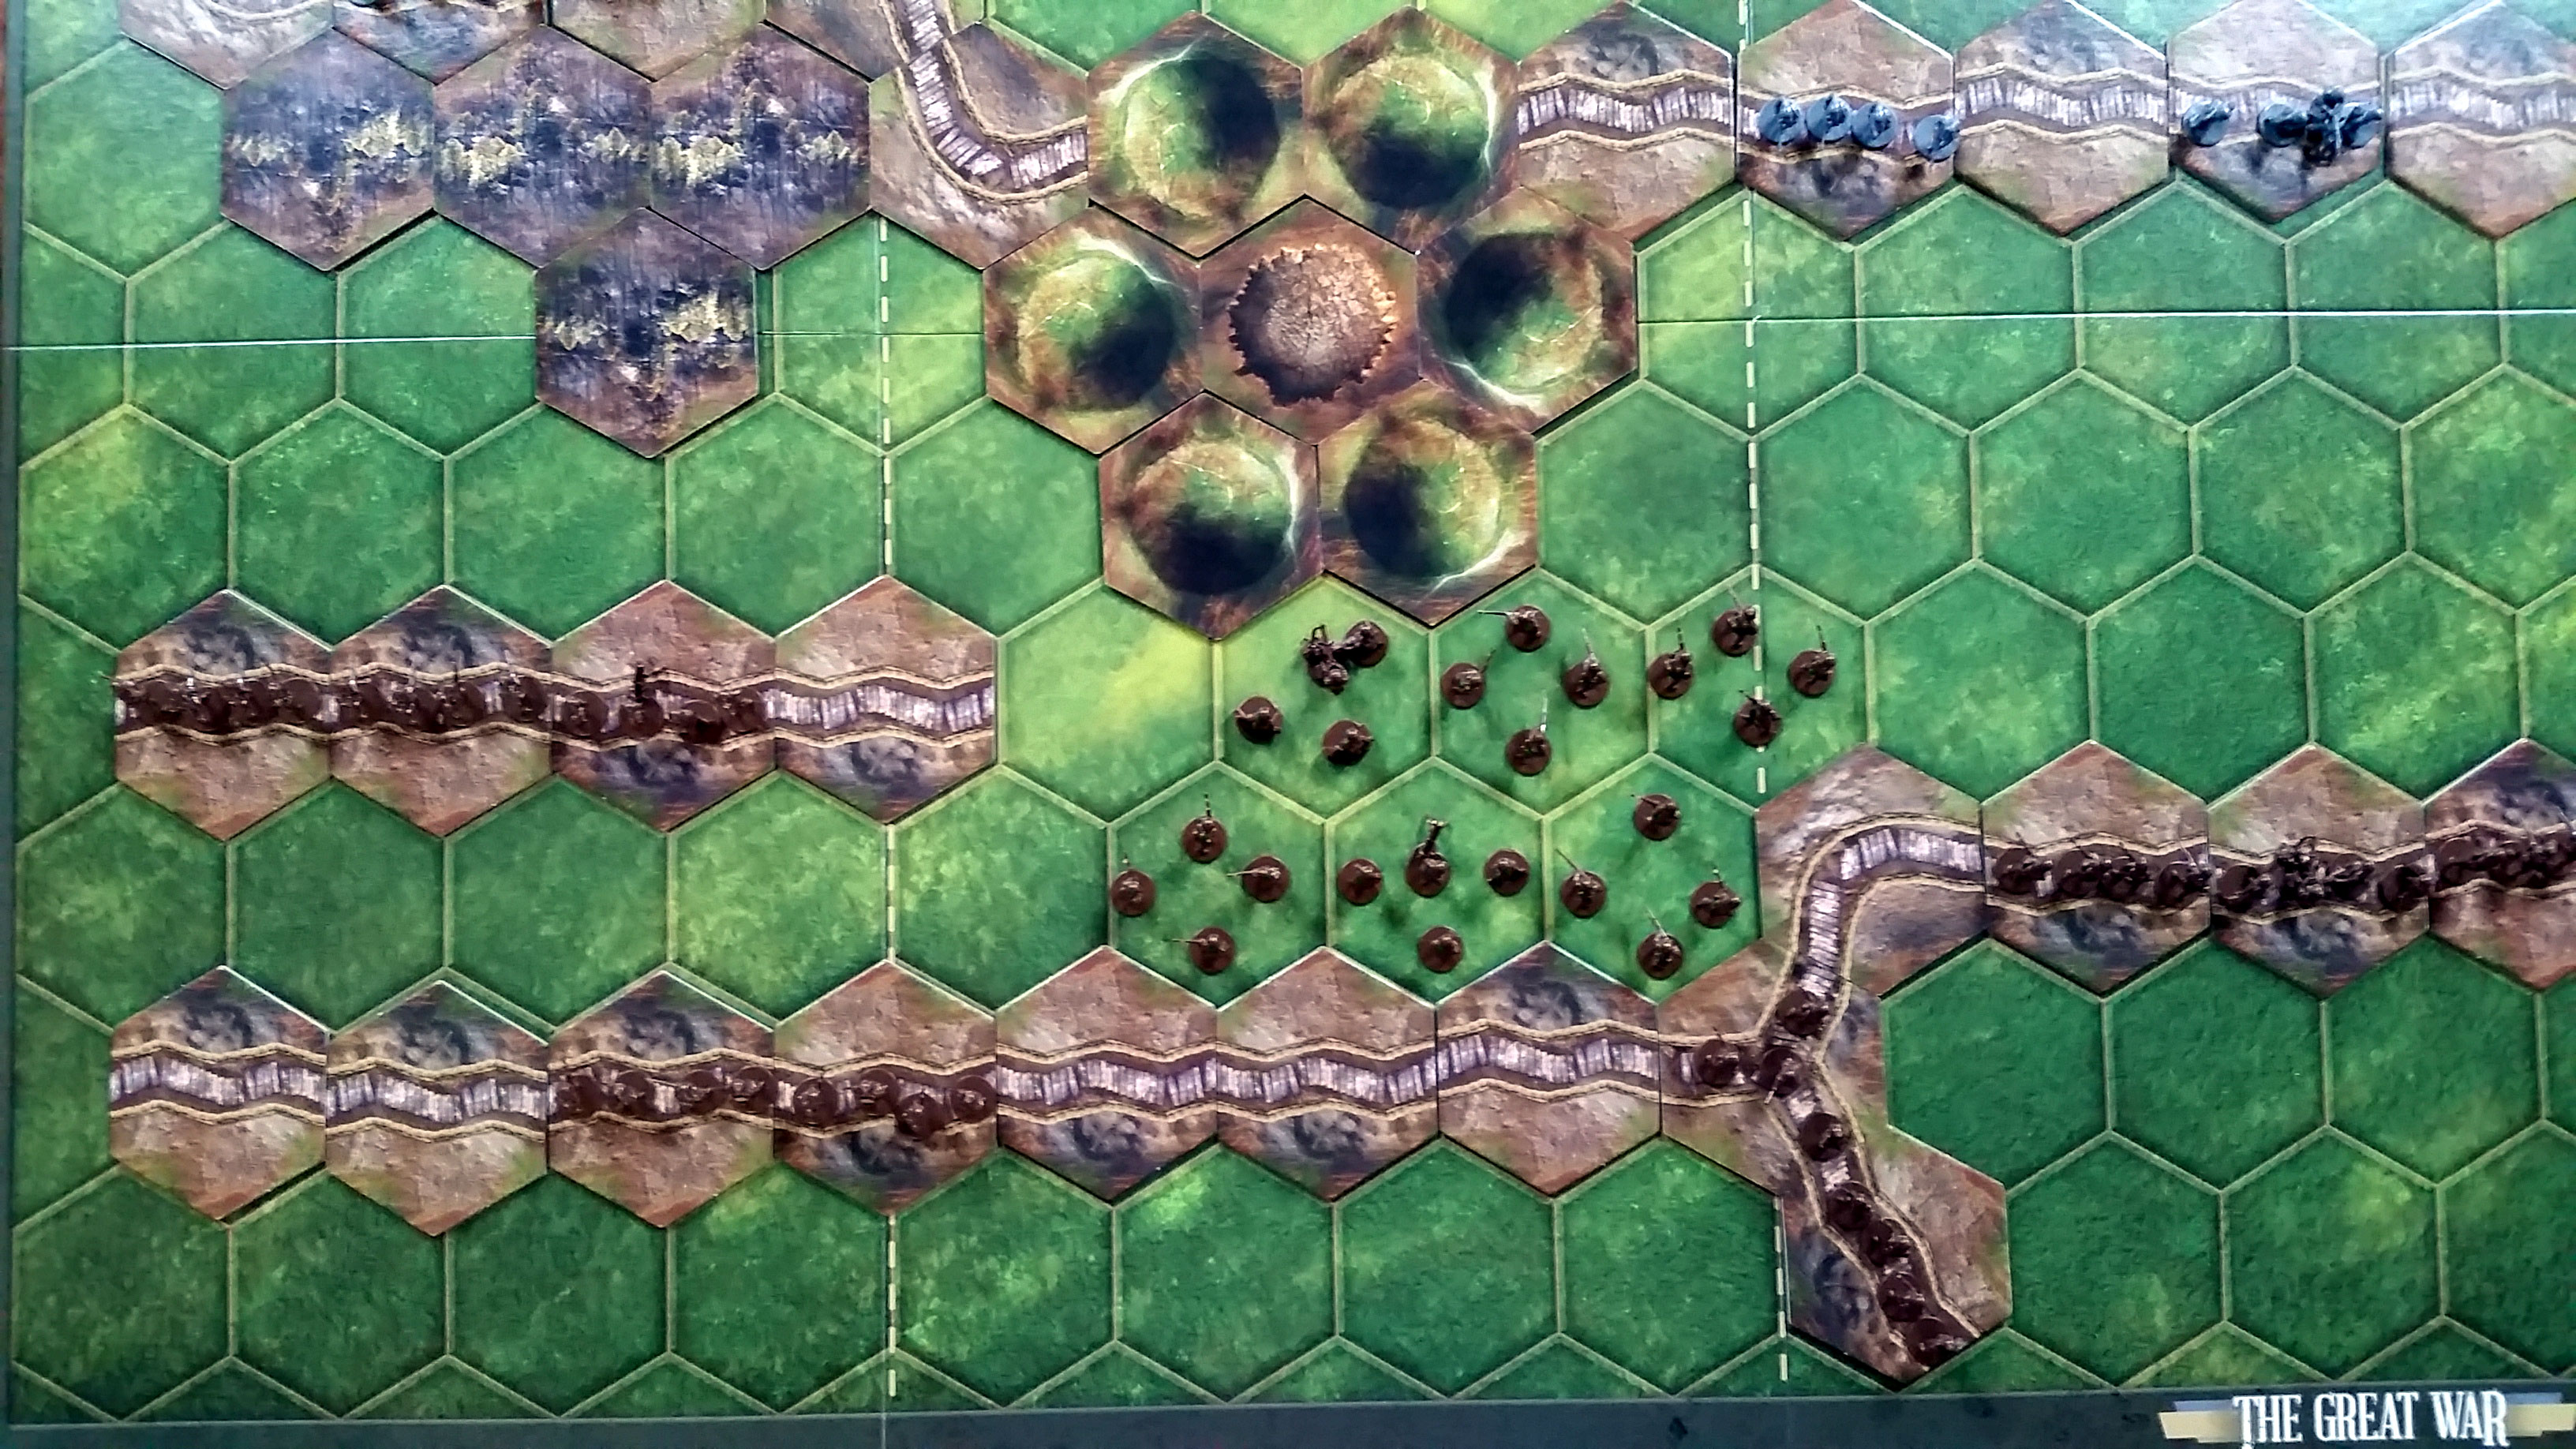
The Somme (Hawthorn Ridge Mine Explosion) before the shelling.
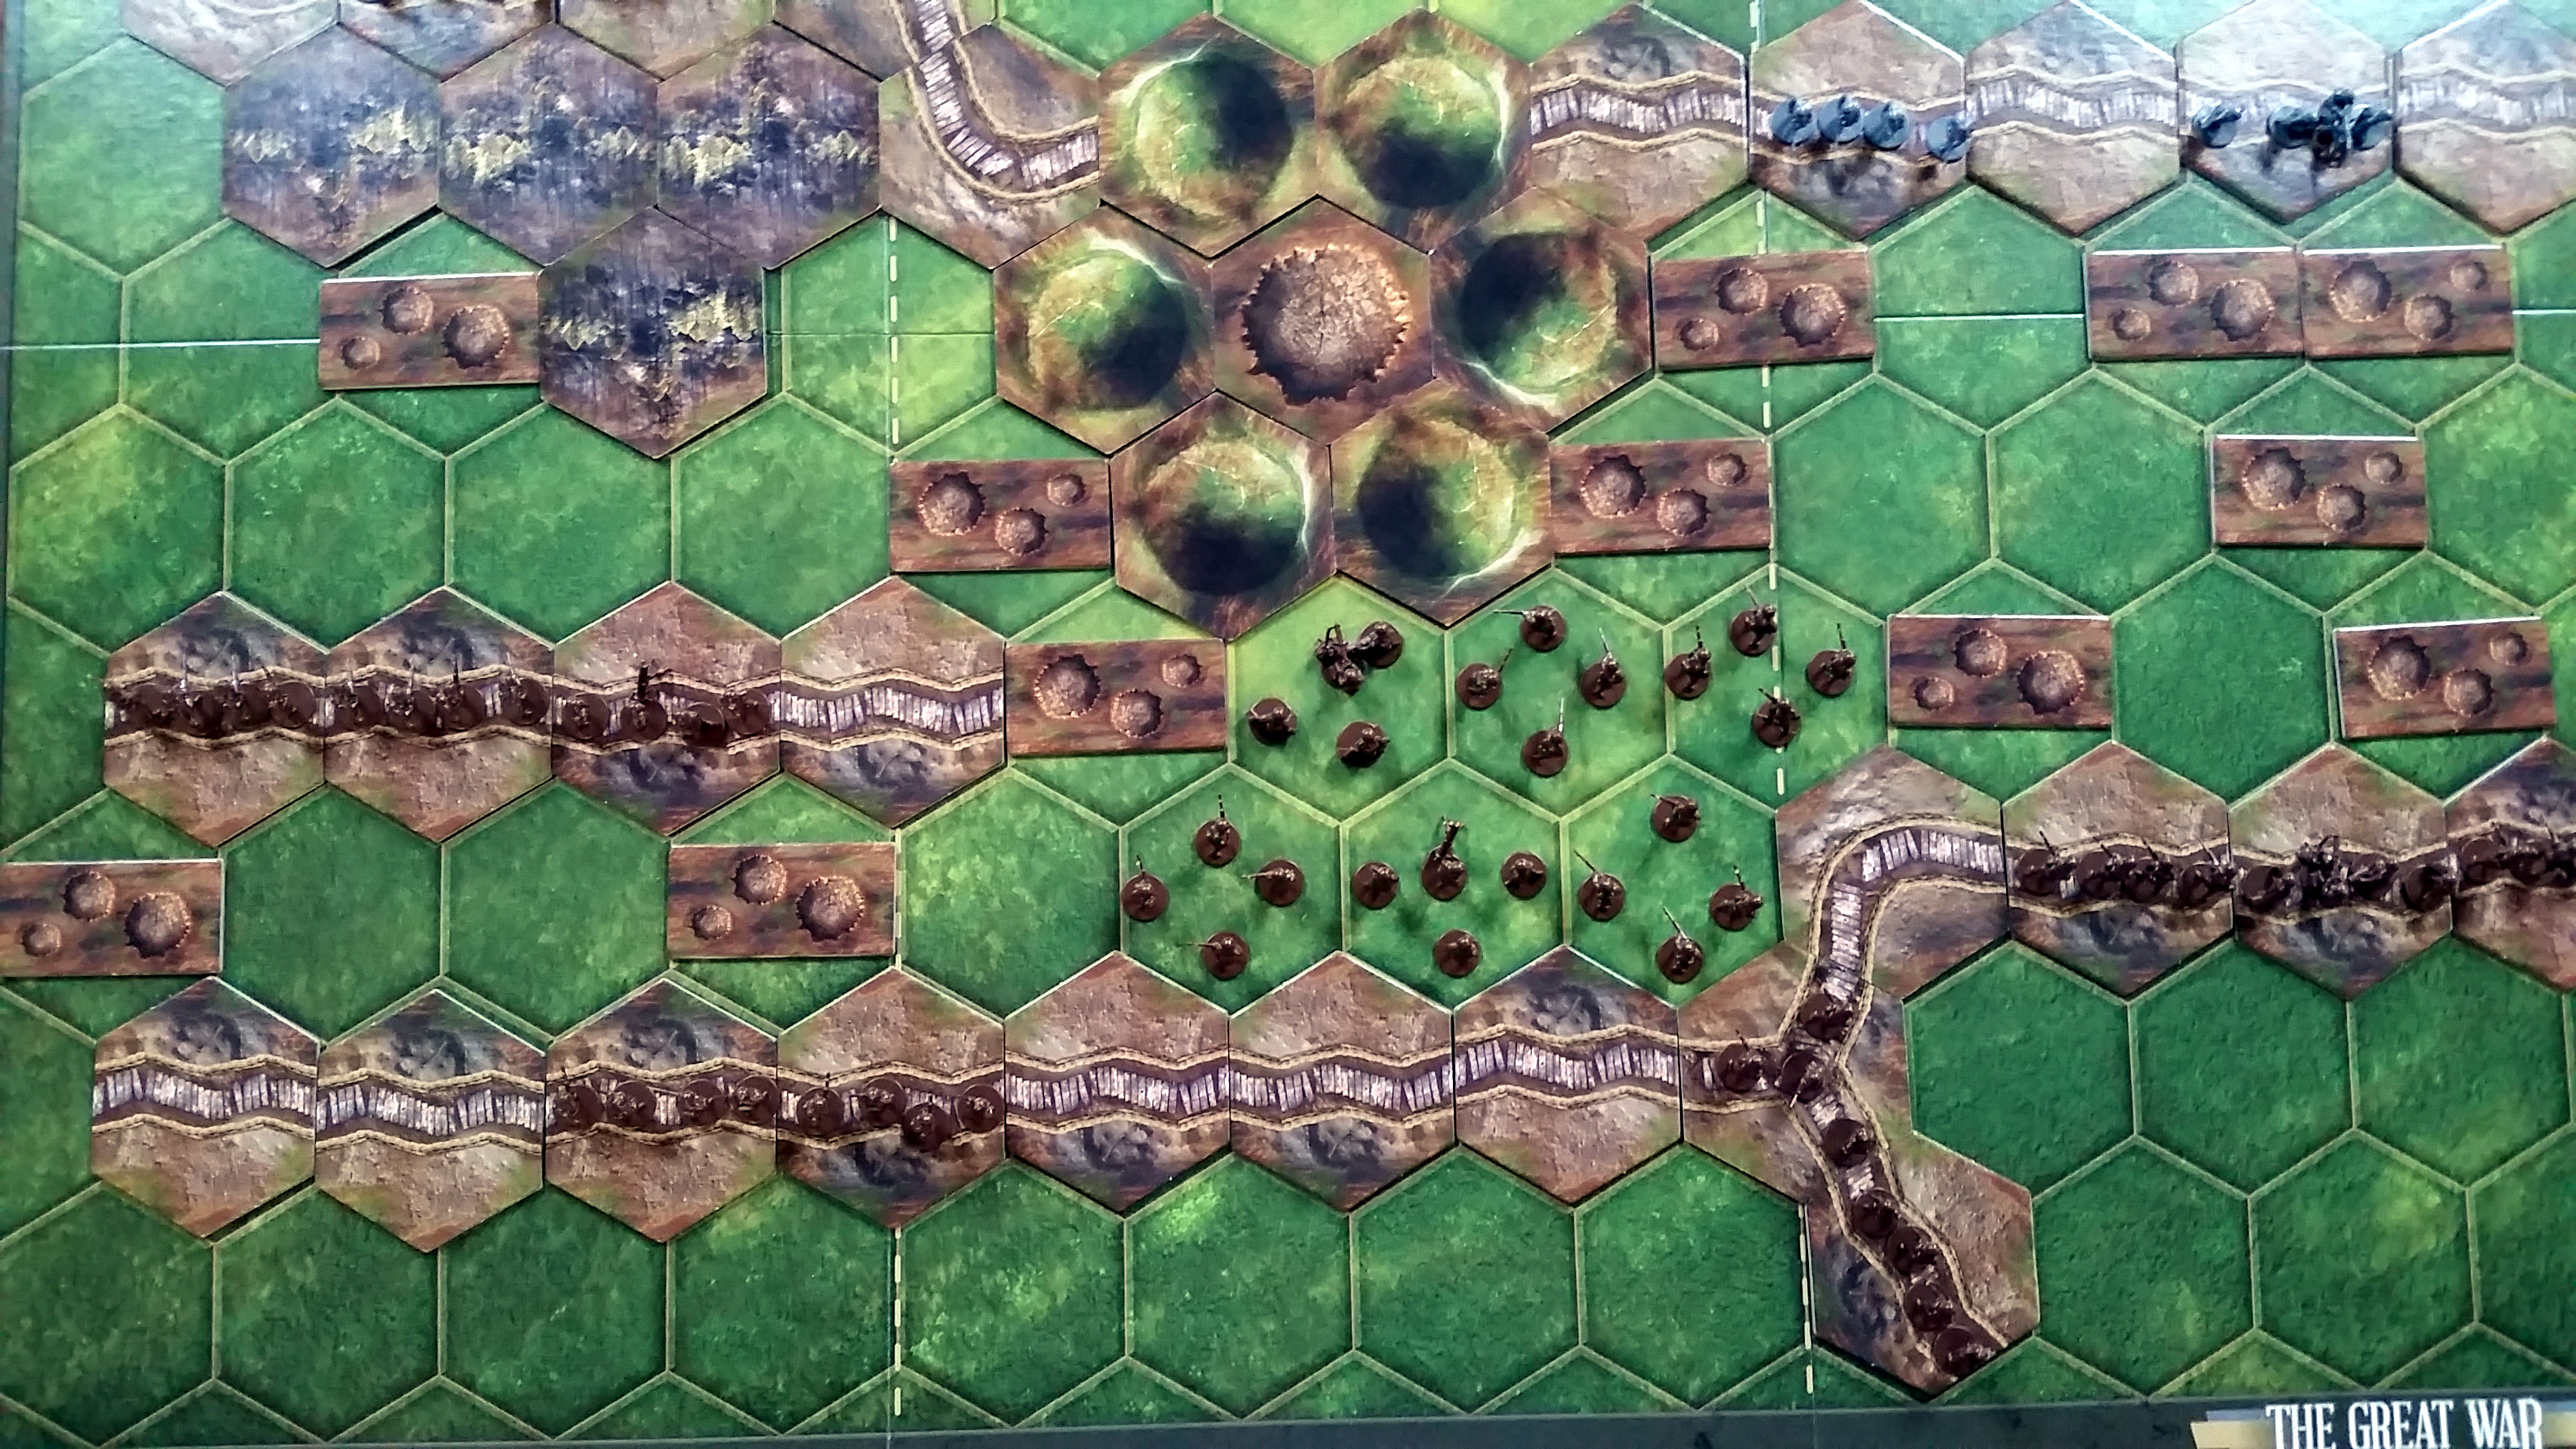
The Somme (Hawthorn Ridge Mine Explosion) after the shelling.
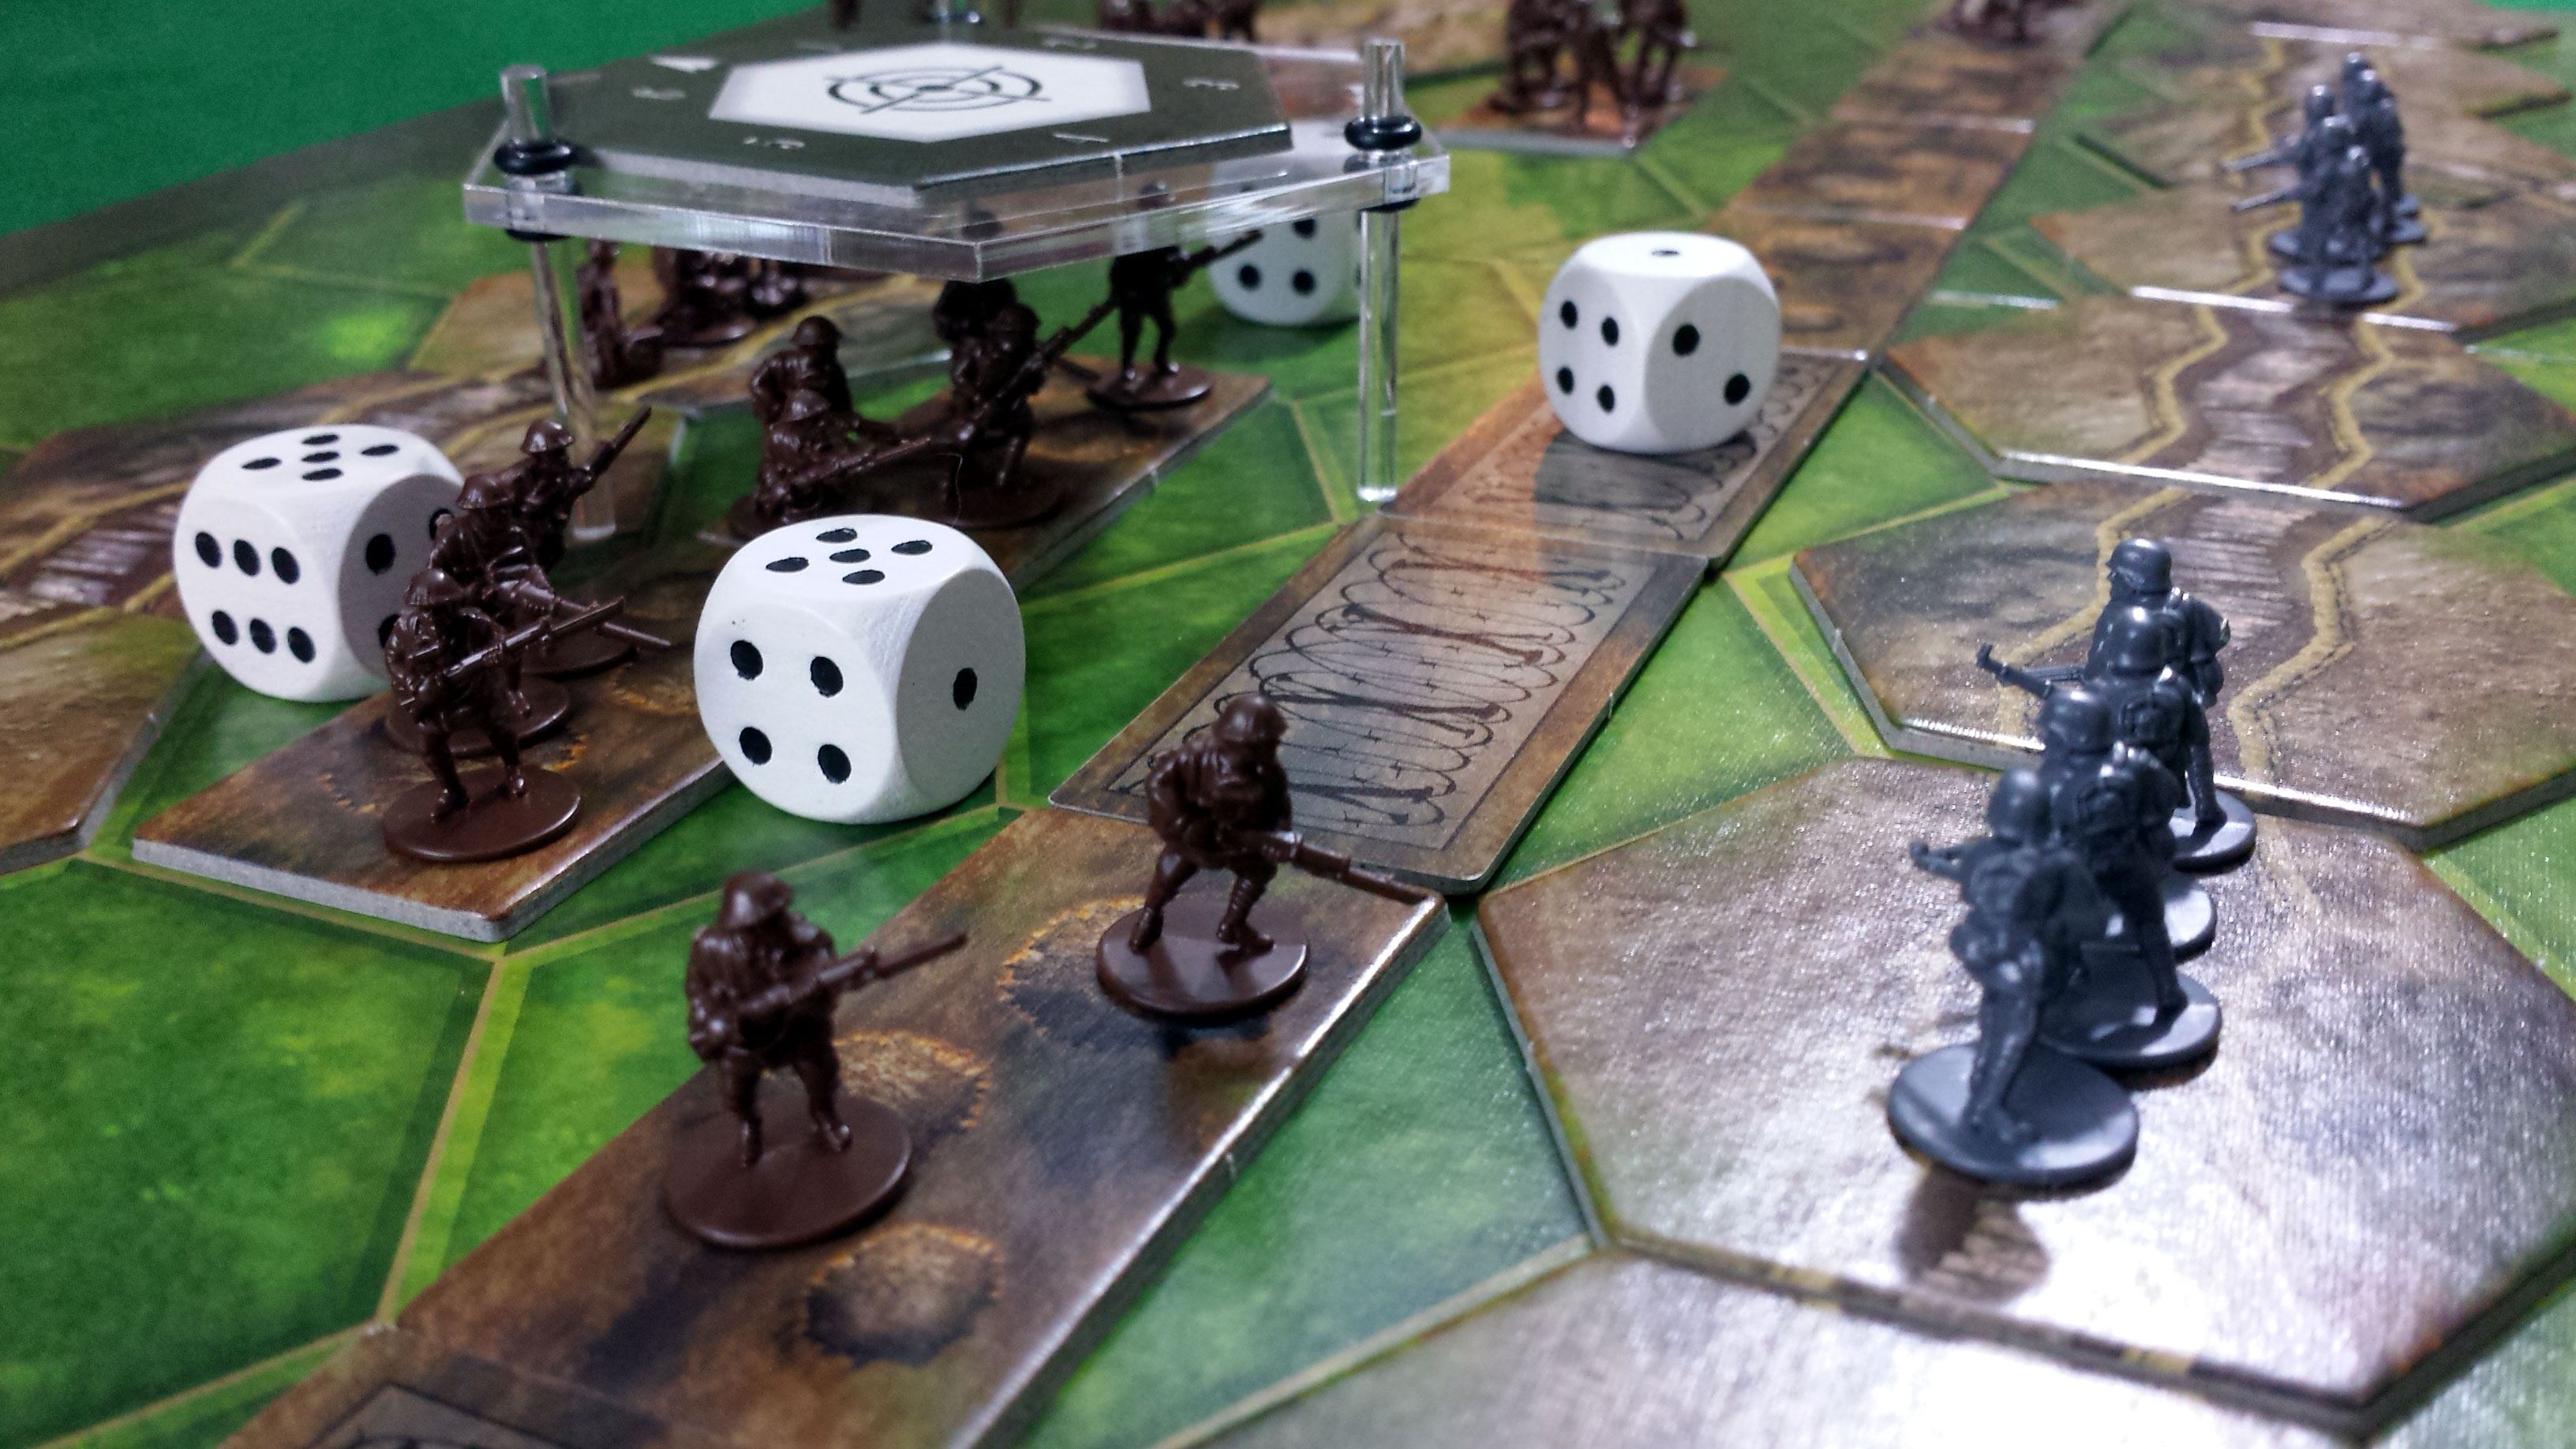
 Dice Based Combat: In the C&C series, you roll a set number of dice based on your attacking units range and other modifiers, then remove your opponents units based on the results. There are terrain modifiers that can remove from, or add to, the base number of dice rolled. This is one of the rules that can vary from game to game. For TGW, you have some of the same modifiers as previous games, but there are also conditions that allow a unit to ignore some of the dice results that would normally result in a hit. For example, an Infantry Unit is attacking another Infantry Unit in a Trench Hex from two hexes away (one open hex between them). This gives the attacking unit two dice to attack. The defending unit, because they are in a trench and two spaces away, can ignore two soldier symbols as well as 2 flags (retreat). Conversely, if the Infantry Unit is attacking from an adjacent hex, they will be able to roll three dice and remove a unit for each Deadly Die (skull) symbol. This change to combat results, ignoring or adding hit symbols depending on the circumstances, adds an additional layer to the way you think about how, where and when to attack. While this may not seem like a huge difference from a game like Memoir ’44, where you just ignore flag (retreat) symbols, it drastically changes the way you approach troop positions prior to and during attacks. It also creates room for other rule modifications like Machine Gun Units having the ability to perform Cross Fire.
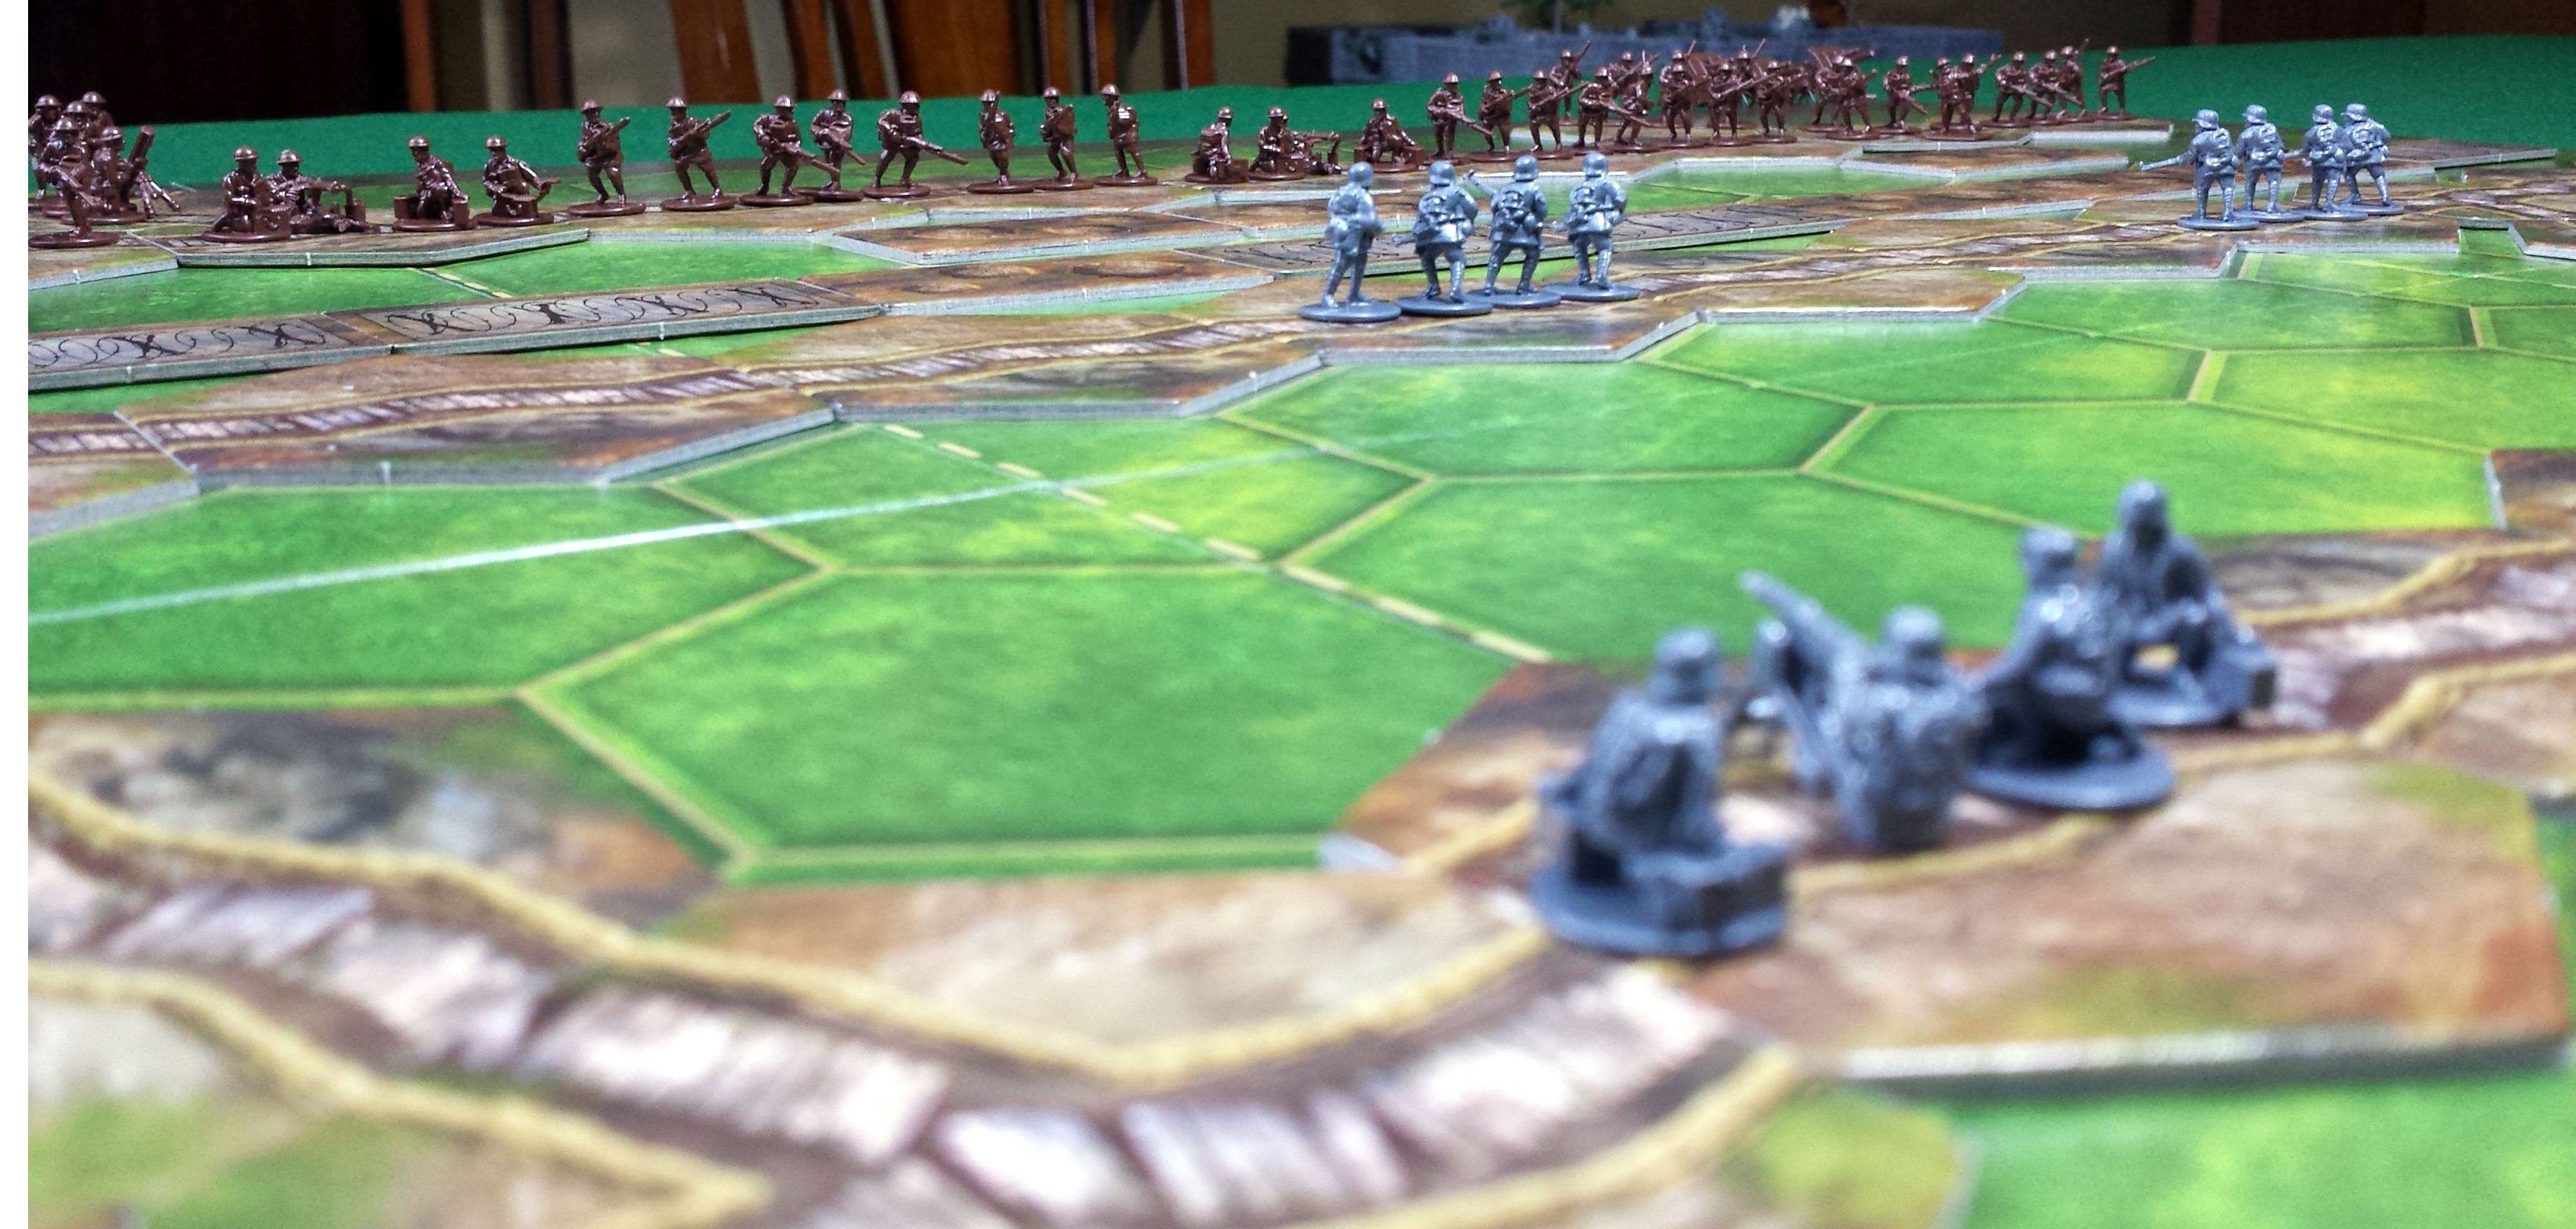
It seems overwhelming, but the machine gun unit, if played correctly, can hold the line
What Cross Fire does is give you the ability to order two or machine machine gun units to target the same enemy unit. While they will still calculate their battle dice separately, they will roll together and combine the results. Not only does this help mitigate the risk of ignoring some dice results that would normally remove figures from units, but from a offensive position, it also forces you to plan your “over the top” attacks across no-mans land very carefully if you are facing machine guns. If you don’t have the right support cards to the assault against the machine guns, you will lose a lot of troops on your opponents next turn. There are several scenarios where one side seems to have a lot more figures, but two well placed Machine Gun Units can counter that very effectively with the right timing and cards.
These modifications to the combat system create a lot of tension throughout the game. It feels like every move truly matters and a single misstep will likely lead to a lost victory medal that could turn the tide of the game.
The game feels every bit as intense as this looks. The combat system drives that tension.
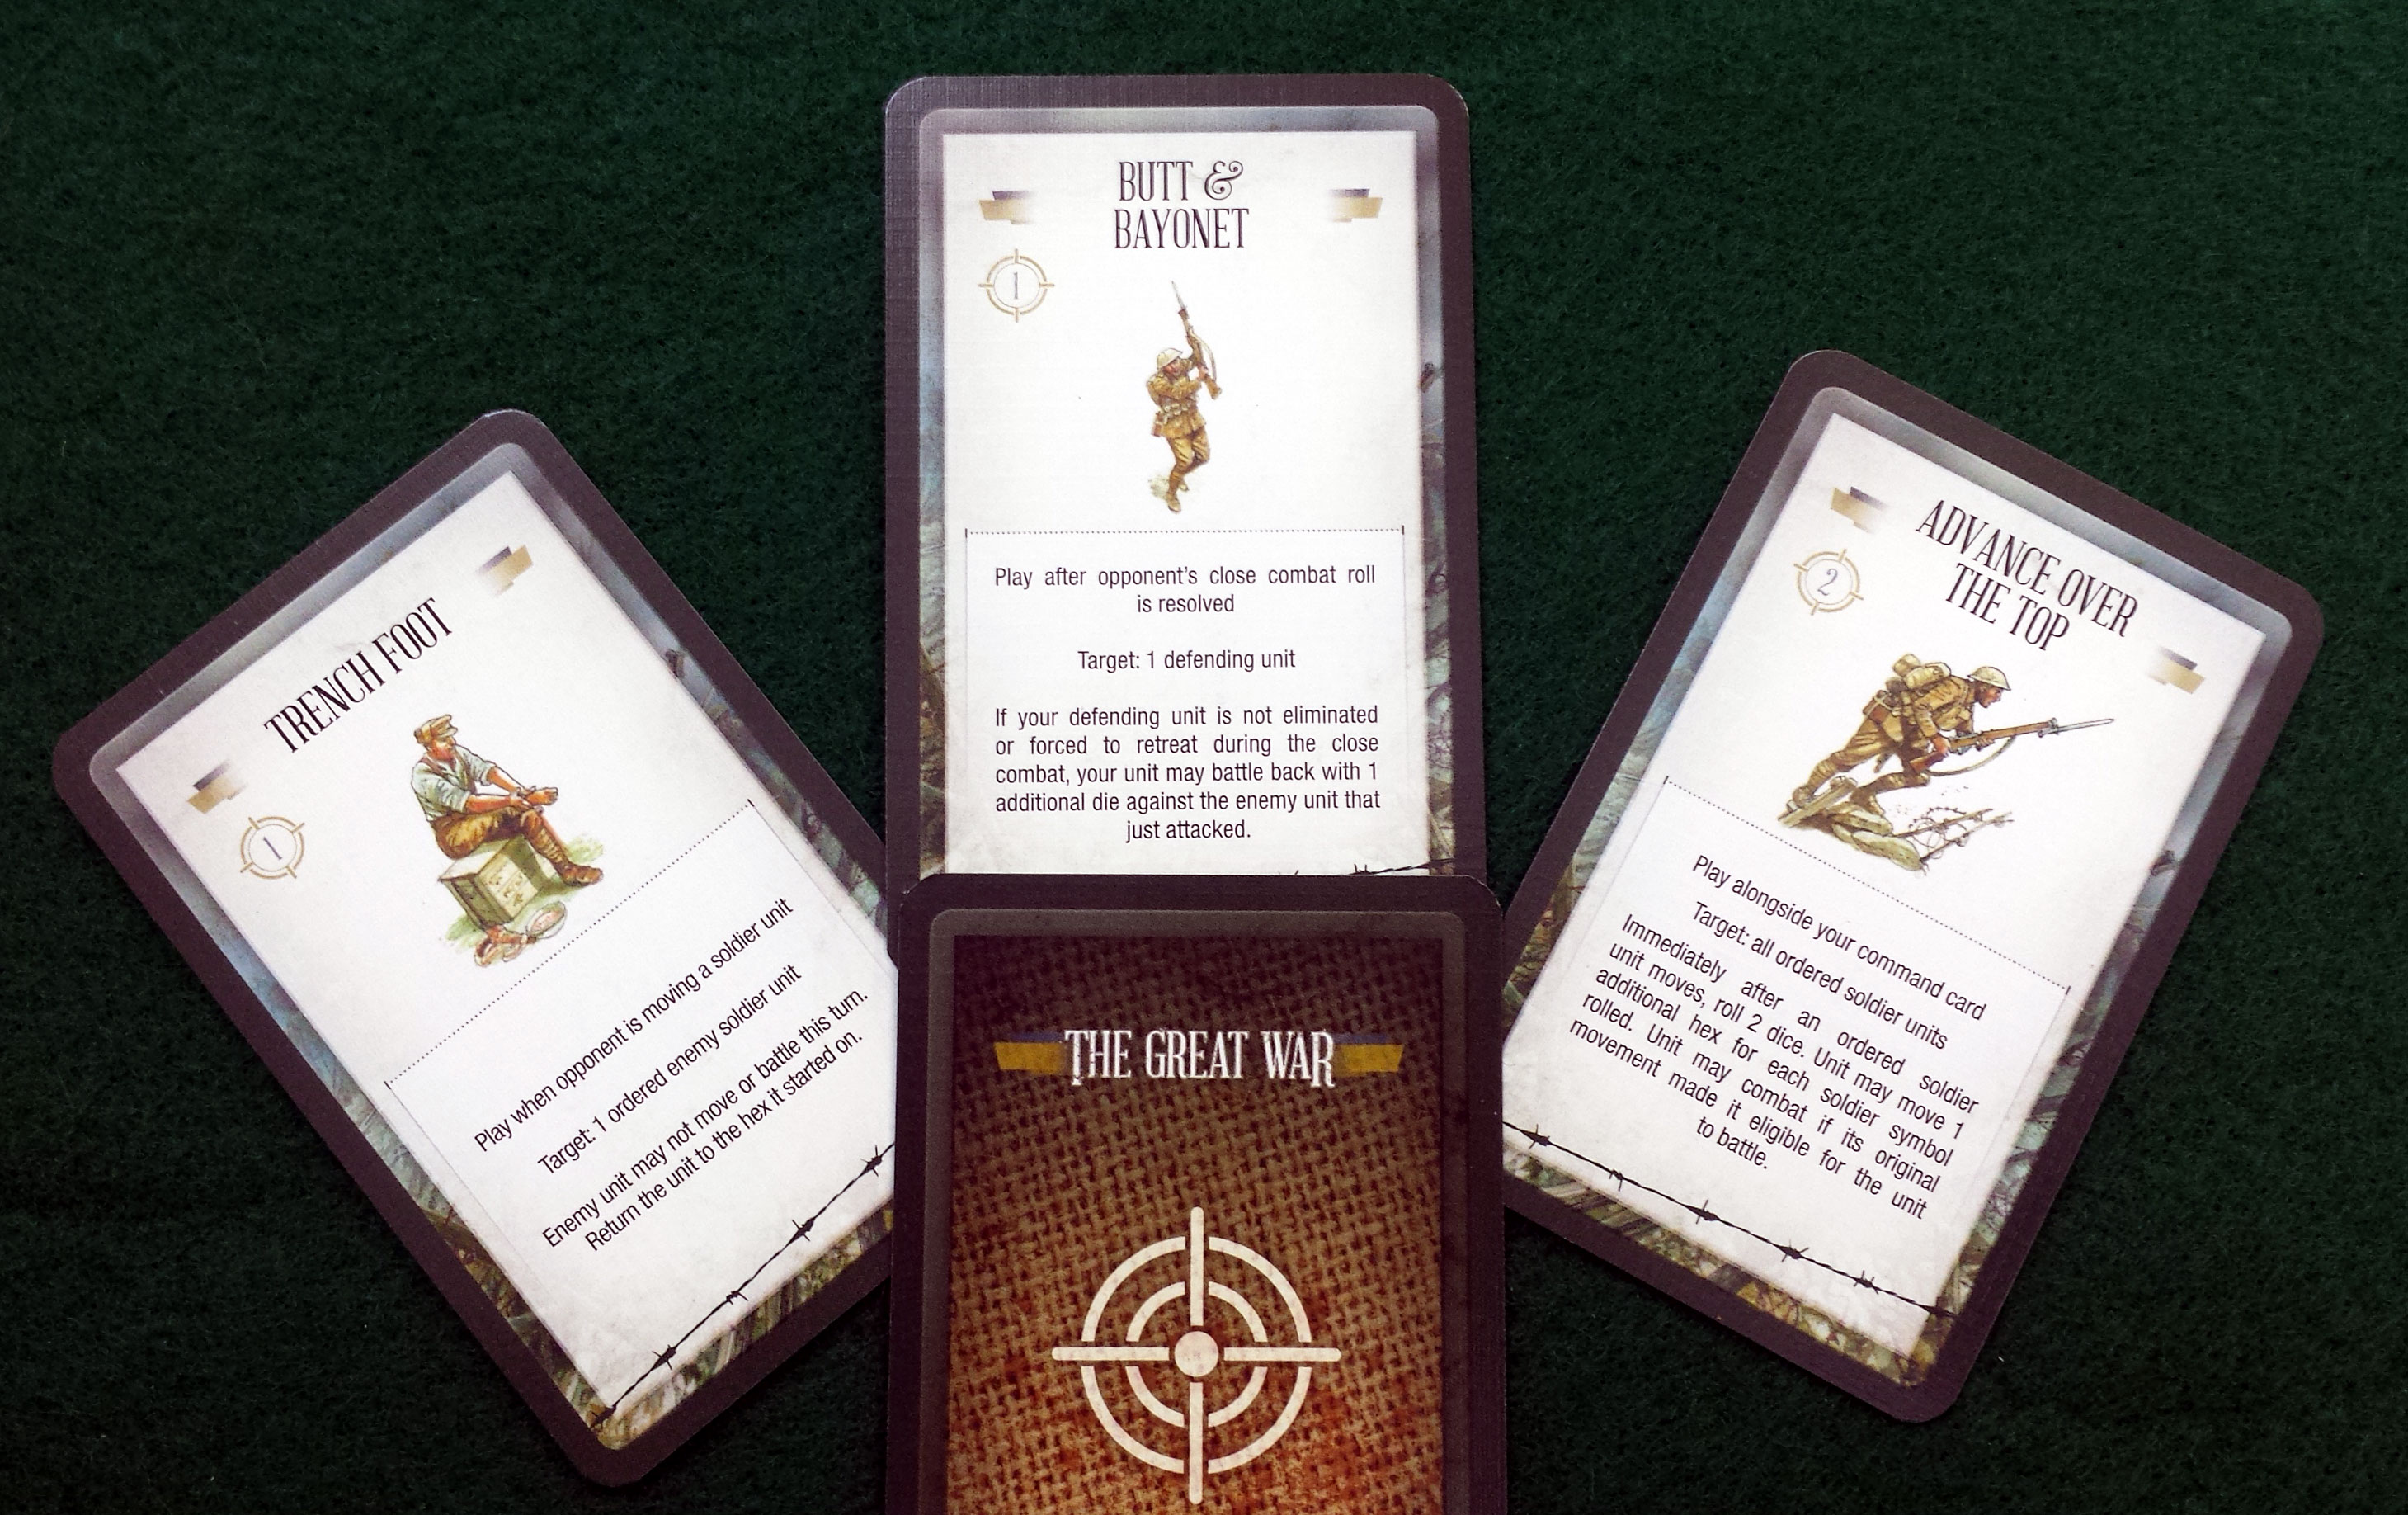 Combat Cards: The Great War uses two different decks of cards for game play. The first is the Command Cards, which play almost identically to those found in other games. The second is Combat Cards, which are purchased by turning in HQ Tokens. This second deck of cards and accompanying currency originally appeared in Samurai Battles as Dragon cards and Honor & Fortune tokens. It might seem familiar because it also appears in BattleLore 2nd edition as Lore and Lore tokens. The Combat Deck for TGW represent things that happened in Word War I. Think lice, gas attacks, spies, etc. Playing these cards might hinder your opponent, help your units, or enact some other condition that might impact game play. Each card has a cost in the upper left corner, representing the number of HQ tokens you have to turn in to play the card. You start each scenario with a certain amount of HQ tokens and Combat cards. Combat cards can be drawn as part of the end of turn activity, or you can pass on drawing a new one to collect two extra tokens. If you didn’t play a Combat card during your turn, you can even discard one in order to gain an extra HQ token. HQ tokens can also be earned back as a result of the star symbol showing on a die result (with a couple of exceptions), or as part of the end of turn activities. There is a lot of different management paths to this part of the game and it adds to the strategic element quite a bit. It may seem like two decks of cards and tokens is a lot to keep track of, but other than taking a bit more space and making card holders a valuable accessory, it is very easy to manage.
This second deck is really used to great effect and the addition of another level of action and tension to the game is very welcome and quite surprising at how much it adds to the experience, The cards can be used to counter some of your opponents moves when they play cards, or even deplete the selection of Command Cards they have to work with. Getting ready to start a big assault has a lot more tension when you don’t know if your opponent is sitting on a stack of HQ tokens and might play a card that negates your plan (or worse). It could be argued that situations like gas attacks, which play a big part historically, seem like they are glossed over with only a card or two to represent them. While this is true, the decision paces the game correctly, without bogging down in more simulation style rules. It also keeps the game at the correct level thematically. At the end of the day, you have to remember that you are playing a game based on events that took millions of lives. I think the C&C series has consistently done a commendable job of making games that are fun, playable, educational, and still pay tribute and respect to the people who were involved in the events. You combine the two many of those elements and you have a game that could be prohibitive and alienating to a broader game base, closing the door to an opportunity for a learning experience.

Reserve Artillery: One of the mechanisms implemented for, and unique to this game, is Reserve Artillery. Reserve Artillery is not part of the game board, but an ability you can perform that simulates the pre-assault shelling that occurred all throughout WWI. Each side has a Reserve Artillery Strength which is determined during the scenario set-up and is usually a number between one and five. You can order Reserve Artillery as one of your units on a Command Card (in which case it has to be in one of the sections identified on the card), or through Combat Cards, which allow it to occur anywhere on the board. This is determined by placing a hexagonal targeting template on the board. The template is numbered one through six, with one of those numbers on each point. You can spend HQ tokens up to your Reserve Artillery strength and for each token you spend, you get to roll a standard die. When the dice are rolled, you put each die in the hex corresponding to the template’s number. For each two dice that have a number, you get to roll for “on-target,” the hex directly below the template, as well as the hex corresponding to the template’s number. If you roll three or more, this signifies a critical hit and you also place a shell crater. It sounds much more fiddly on paper than how it plays and is a solid addition to the game, but it can be a bit deceiving strategically.
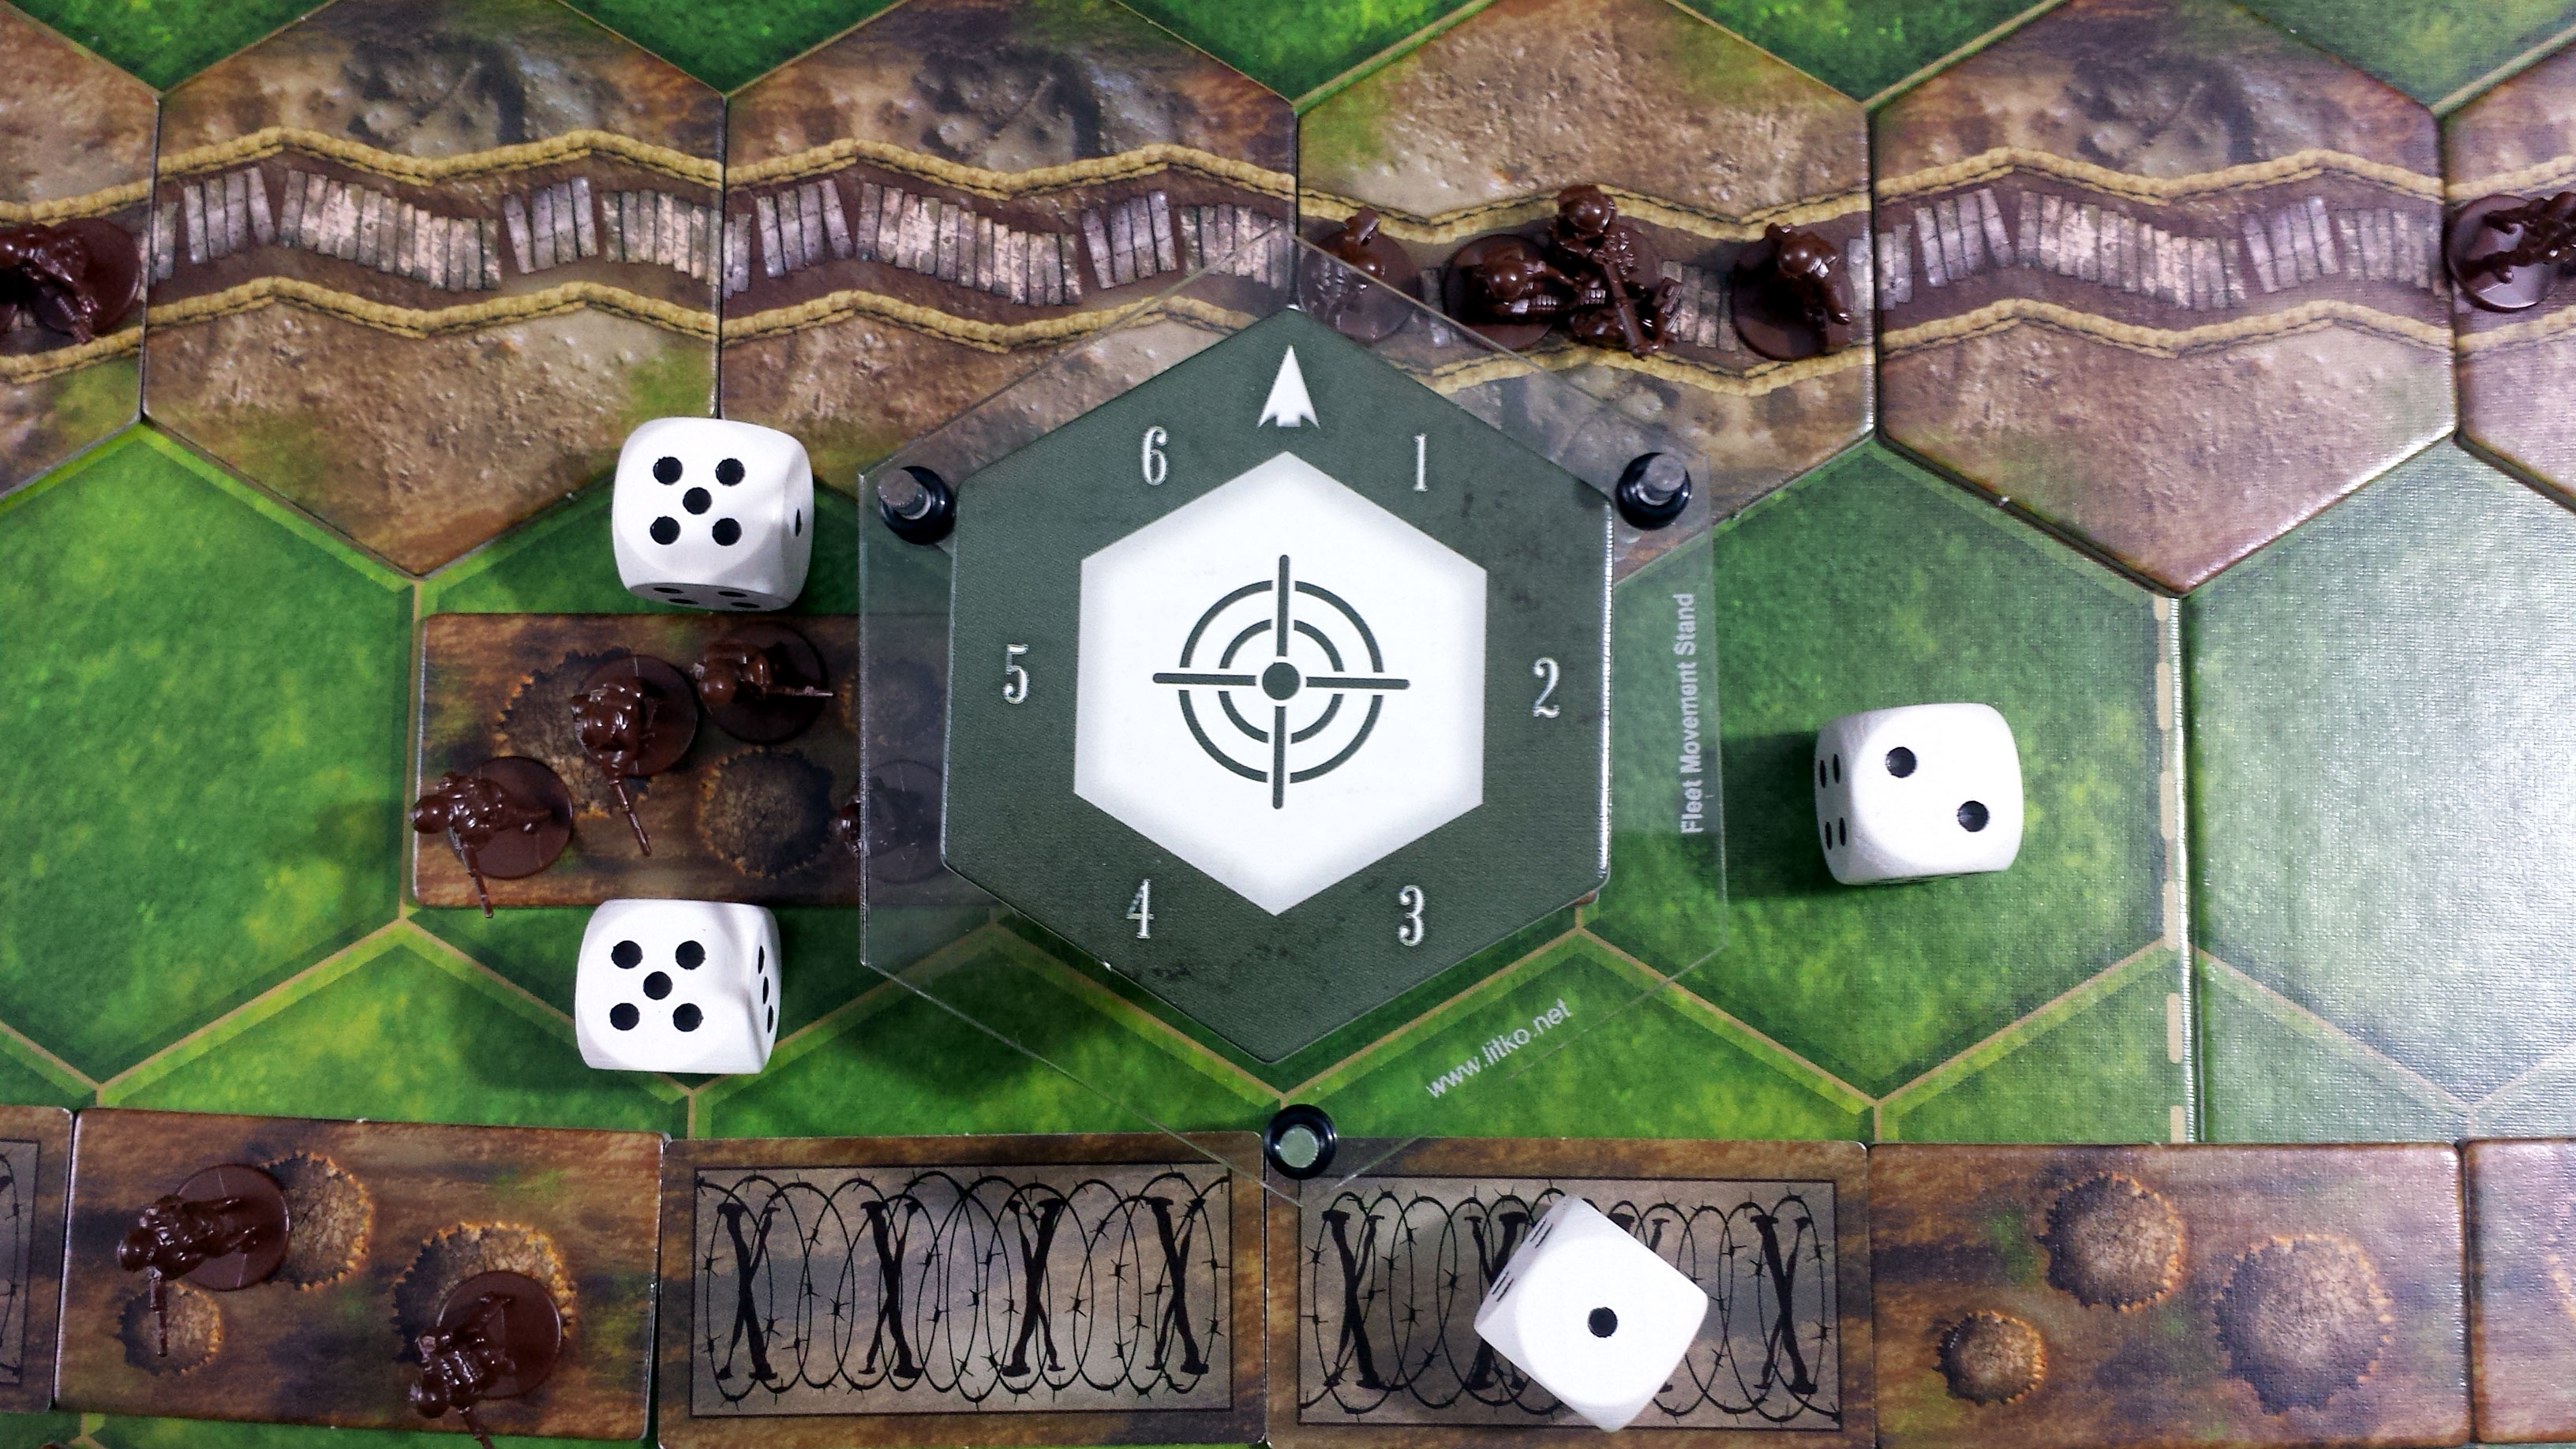
The handy accessory is from Litko and is for Twilight Imperium 3. The new TGW expansion, Tank!, includes a swank new targeting template that is very similar, but with the information engraved on the plastic!
When you read about Reserve Artillery, it sounds devastating and it can be, but it is also based on the luck of the roll. This can lead to turns where it feels you wasted your opportunity because the dice didn’t roll the way you wanted. This isn’t a flaw of the mechanism though, it’s artfully representational of what happened during the war. Advancements in artillery allowed all sides of the war to create devastation from further distances than ever before, but accuracy lagged far behind. This, combined (and in part as a result of) with trench warfare, helped create the apocalyptic landscape that continues to burn images in your minds to this day. It led to widespread devastation and became quite effective as the war progressed, especially in direct correlation with the advancements in aviation, but there were millions of shells that did nothing more than destroy the earth, effectively doing nothing to aid progress for the side that shot them. Google the battle of the Somme and you can very quickly learn how ineffective and counter-productive some of these shelling efforts were.
Do I Need Another C&C Game?
If you are a fan of any games that use the Command and Colour system, then the answer is a resounding yes. Richard Borg is a mad genius at mixing similar ingredients together time after time to create a series of war games that are very accessible, treat the topic with respect, provide educational value, and remain extremely fun. Memoir ’44 and BattleLore 2nd Edition are the two most popular siblings of this game. While I really enjoy BattleLore and its take on a fantasy theme, I am going to remove it from this comparison since we are discussing historically based games. If you have never played a game using the C&C system and are interested in historical war games, then my answer is still yes (and still resounding), but whether it is The Great War or Memoir ’44 depends a bit on what period you are most interested in. From a historical perspective, WWI and WWII are intertwined entirely but wholly different. I think the same about the two games. If you are interested in one historical period but not the other, that will definitely influence your decision. Pick the game that represents the period you have more interest in; you can’t go wrong with either of these games. I would say, however, that you cannot go wrong with BOTH of these in your collection. I own everything that was made for Memoir ’44 (except the carry case) and currently own everything made for The Great War. They both will get time on my table because not only do they represent two wildly interesting and important periods in history, but they play differently enough to have their own identities.
“The Great War has become my favorite of the Command and Colour games. While it might not be as polished as Memoir ’44 or BattleLore, it is very well thought out and the game play represents the time period better than any of the other version.”
The additional elements require you to think both strategically and tactically or you will be punished severely; probably more so than any of the other games. Card and hand management is crucial. After all, Command and Colours at its heart is a card based system with miniatures and not the other way around. TGW illustrates this with precision. Building the correct hand of cards before you begin an assault is the difference between victory and defeat. The result is that the pace of the game is slower than a game like Memoir ’44. It feels like the game is on a much larger scale and you have to really think about troop positioning as you build your hand of cards, but then the tension ramps up as you begin your assault and try to gain victory medals. I have a good eight to ten plays under my belt and most take 90 to 120 minutes. If the game wasn’t such a satisfying experience, this would be one of my gripes. With Memoir ’44, you can play a couple of games so you can play each side, in about the same time as it would take for one session of TGW. I enjoy the deeper experience with The Great War that much more, so it doesn’t feel like too much of a detracting element. I just plan accordingly
I highly recommend you buy this game. I don’t believe The Great War is yet available for distribution in the US. I believe they are still working on US distribution, but you can order the game directly through PSC’s website, The Plastic Soldier Company, LTD. The extra shipping cost and time is well worth the trouble.
As I type this, I have the new expansion TANK! sitting on my table. I am curious to see how this expansion fits in with the game. Look for an upcoming review and I will try to deliver it a bit quicker this time…
Roll well and groove on.
If you are interested in learning more about Richard Borg and the development of the Command and Color system (switching to American English for this one), please take some time to listen to the episode of Ludology, The Battle Begins, where they interview Richard Borg about designing war games that appeal to a broader audience. It is an interesting listen and one of the best gaming podcast around.
Categories: Board Games, Reviews, War Games
